
- General Questions
- How to Questions - Cloud
- Installation
- Microix Cloud App (Web)
- Budget
- Requisition
- Time Clock
- Inventory
- Timesheet
How do I set up the email reply account?
Note: Currently if Email is replied using Outlook Application it does not add to Audit Trail, You will need to open your mail account in Browser to reply to email 12/14/2016
How and why do I set up the email reply account?
From within a document, users have the ability to email other users. After configuration of the email reply account, users will be able to reply to that email from within Outlook and Microix will then automatically append that reply to the audit trail of the document, allowing easier audit/tracking of conversations related to a document.
Note: The typical audience for this document is experienced IT personnel. If you need assistance with this topic, please have your IT personnel available when contacting support.
Configuration of email account:
Note: The following configuration is for a GMAIL hosted email account. Your settings may differ.
1. To begin the process, create a GMAIL email account. For this example, I have already created the account MicroixHelpDesk@gmail.com
2. Log in to your account through the web interface. In the top right corner, look for the settings dropdown. Click it, and select “Settings.”

3. Choose the “Forwarding and POP/IMAP” tab. Enable POP and Enable IMAP. Save your changes.

4. For a basic webmail provider, the previous steps are normally all that is required. For GMAIL in specific, we have to enable “less secure apps” for our account.
The link provided below will allow you to turn this on, assuming you are already logged into GMAIL.
https://www.google.com/settings/security/lesssecureapps
Configuration of Microix:
1. Launch Microix. Navigate to Maintenance > Global Options > Application Options
2. In the top right hand corner of the options screen, on the SMTP Mail Server Information tab, we will now fill in the GMAIL Server Name, Auth Method, User ID, Password, and Port. Click to “Enable Email.”
Note: The “Test Email” button will not work until you restart Microix in a later step.

3. Next, select the POP3 Mail Server information tab and fill in the appropriate Server Name, Port, User ID, and Password.

4. Next navigate to Maintenance > Global Options > Global Settings.

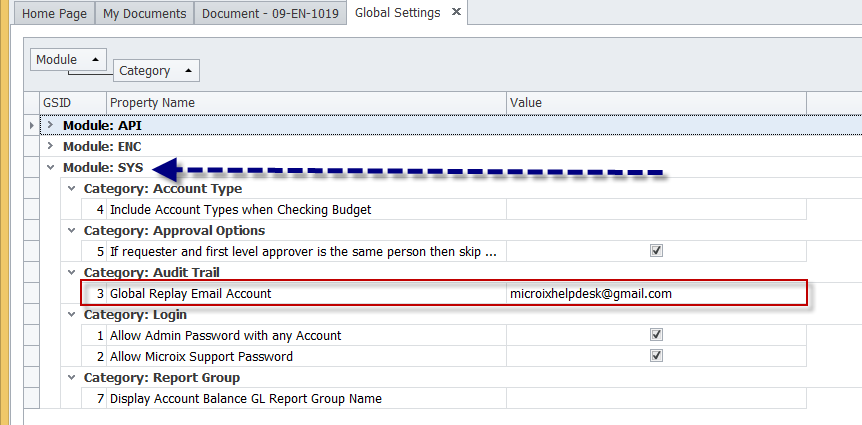
5. Look for an entry near the bottom. It is under Module:SYS, Category:Audit Trail, and the entry itself is called “Global Replay Email Account.” Enter the email address here and then click save in the bottom right corner.
6. Navigate to Maintenance > Users. Associate an email address with each user that will be utilizing the system for notifications or replies. Lastly, restart the Microix software. It will re-read the newly changed settings and you can now try the “Test Email” button in Application Options.

Usage Example:
1. Inside of Microix, open any document where ‘Send Email Message’ is enabled. Choose the email icon. Select a recipient and a CC (optional). Type your email message. Click on Send.

2. Another user would open the email that they just received inside their mail client. Notice that there is a CC of the “Global Replay Account.”

3. Choose to “Reply ALL” to this message. IMPORTANT NOTE: Some email clients remove the CC address, please VERIFY that the CC address is copied over into the reply. If not, type it in before sending the reply. Do not change the subject. Type your reply message and click ‘send.’

4. Microix will append the reply to the document’s audit trail, automatically.

How and why do I set up the email reply account?
From within a document, users have the ability to email other users. After configuration of the email reply account, users will be able to reply to that email from within Outlook and Microix will then automatically append that reply to the audit trail of the document, allowing easier audit/tracking of conversations related to a document.
Note: The typical audience for this document is experienced IT personnel. If you need assistance with this topic, please have your IT personnel available when contacting support.
Configuration of email account:
Note: The following configuration is for a GMAIL hosted email account. Your settings may differ.
1. To begin the process, create a GMAIL email account. For this example, I have already created the account MicroixHelpDesk@gmail.com
2. Log in to your account through the web interface. In the top right corner, look for the settings dropdown. Click it, and select “Settings.”
3. Choose the “Forwarding and POP/IMAP” tab. Enable POP and Enable IMAP. Save your changes.
4. For a basic webmail provider, the previous steps are normally all that is required. For GMAIL in specific, we have to enable “less secure apps” for our account.
The link provided below will allow you to turn this on, assuming you are already logged into GMAIL.
https://www.google.com/settings/security/lesssecureapps
Configuration of Microix:
1. Launch Microix. Navigate to Maintenance > Global Options > Application Options
2. In the top right hand corner of the options screen, on the SMTP Mail Server Information tab, we will now fill in the GMAIL Server Name, Auth Method, User ID, Password, and Port. Click to “Enable Email.”
Note: The “Test Email” button will not work until you restart Microix in a later step.
3. Next, select the POP3 Mail Server information tab and fill in the appropriate Server Name, Port, User ID, and Password.
4. Next navigate to Maintenance > Global Options > Global Settings.
5. Look for an entry near the bottom. It is under Module:SYS, Category:Audit Trail, and the entry itself is called “Global Replay Email Account.” Enter the email address here and then click save in the bottom right corner.
6. Navigate to Maintenance > Users. Associate an email address with each user that will be utilizing the system for notifications or replies. Lastly, restart the Microix software. It will re-read the newly changed settings and you can now try the “Test Email” button in Application Options.
Usage Example:
1. Inside of Microix, open any document where ‘Send Email Message’ is enabled. Choose the email icon. Select a recipient and a CC (optional). Type your email message. Click on Send.
2. Another user would open the email that they just received inside their mail client. Notice that there is a CC of the “Global Replay Account.”
3. Choose to “Reply ALL” to this message. IMPORTANT NOTE: Some email clients remove the CC address, please VERIFY that the CC address is copied over into the reply. If not, type it in before sending the reply. Do not change the subject. Type your reply message and click ‘send.’
4. Microix will append the reply to the document’s audit trail, automatically.
| Files | ||
|---|---|---|
|
1.png 81.4 KB |
||
|
1.png 31.9 KB |
 Get help for this page
 Jitbit HelpDesk