How to Import Credit Card Statement from an OFX file
Creation date: 10/27/2016 10:39 AM
Updated: 4/21/2017 11:52 AM
Attention! This article is ONLY for customers importing their credit card statement via an OFX file. It is NOT intended for customers who are setup for Microix to retrieve the statement directly from the bank’s OFX web service.
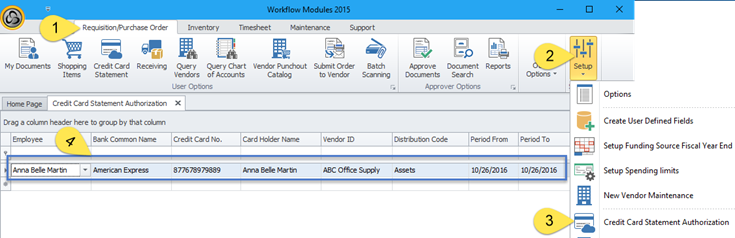
1. Navigate to Requisition>Setup>Credit Card Statement Authorization and enter each credit card user.
a. Employee – enter the user’s name who will be performing the task of importing the credit card statement
b. Bank Common Name – select bank name or if not in list select “Import from file”
c. Credit Card No. – enter last four digits of your card number
d. Card Holder Name – enter the card holder’s name
e. Vendor ID – enter MIP’s vendor Id for the credit card company
f. Distribution Code – enter the user’s distribution code (setup a distribution code in MIP for each user account if it does not exist)
g. Period From/Period To – enter the from and to period of the billing statement
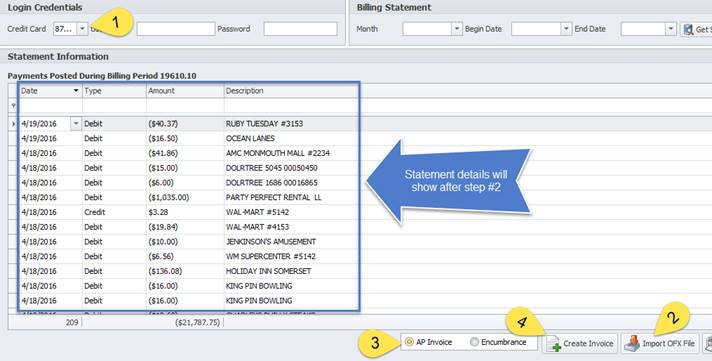
2. Using your bank’s online account, download an OFX format of your credit card statement and save the file to your local computer. Next, navigate to Requisition>Credit Card Statement from the Ribbon menu to being the import process as shown below
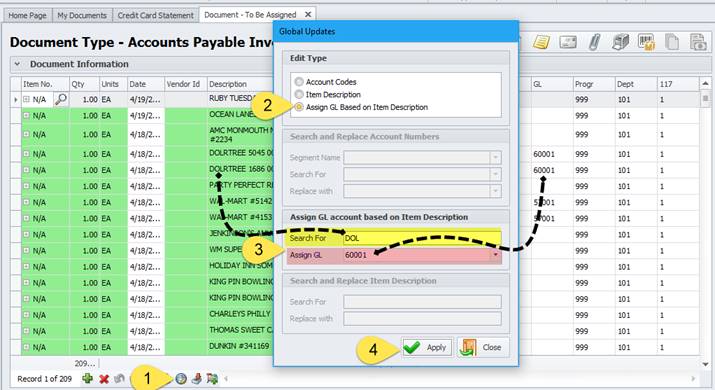
3. After creating the Invoice, navigate to Requisitions>My Document to find the newly created invoice in the list. Edit the document and you will see all entries from the statement are now visible including the expense coding except for GL. Click on the “Global Update’ button to assist with ‘Assigning GL Based on Item Description”. (Example: Search for words beginning with “DOL” and set the GL to 60001 or search for all transaction lines beginning with “WAL-MART” and assign GL to 50001. Upon creating your next month’s statement, Microix will automatically try to populate your GL account based on how you coded the prior months statements.
1. Navigate to Requisition>Setup>Credit Card Statement Authorization and enter each credit card user.
a. Employee – enter the user’s name who will be performing the task of importing the credit card statement
b. Bank Common Name – select bank name or if not in list select “Import from file”
c. Credit Card No. – enter last four digits of your card number
d. Card Holder Name – enter the card holder’s name
e. Vendor ID – enter MIP’s vendor Id for the credit card company
f. Distribution Code – enter the user’s distribution code (setup a distribution code in MIP for each user account if it does not exist)
g. Period From/Period To – enter the from and to period of the billing statement
2. Using your bank’s online account, download an OFX format of your credit card statement and save the file to your local computer. Next, navigate to Requisition>Credit Card Statement from the Ribbon menu to being the import process as shown below
3. After creating the Invoice, navigate to Requisitions>My Document to find the newly created invoice in the list. Edit the document and you will see all entries from the statement are now visible including the expense coding except for GL. Click on the “Global Update’ button to assist with ‘Assigning GL Based on Item Description”. (Example: Search for words beginning with “DOL” and set the GL to 60001 or search for all transaction lines beginning with “WAL-MART” and assign GL to 50001. Upon creating your next month’s statement, Microix will automatically try to populate your GL account based on how you coded the prior months statements.
image001.png
image002.jpg
image003.jpg