Access Microix Cloud/HTML Approval Application over the Web
Our support department will not assist with this option as it requires knowledge of specify hardware and domain providers. We suggest speaking with your router support rep and also your domain hosting company to create a sub-domain for access to your Microix Cloud/HTML Application. Here is an example of a NetGear ProSafe Business Router and Goddady sub domain setup.
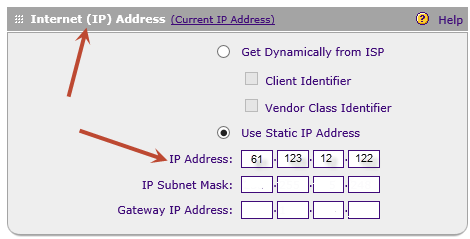
Step 1. Change/modify your internal firewall (router) inbound services to allow HTTP request to your local IIS server (internal IP address of IIS Server).

Step 2. Connect to your domain hosting provider and use their administration panel (if one exist or call them) to create a sub-domain entry for your existing domain name.
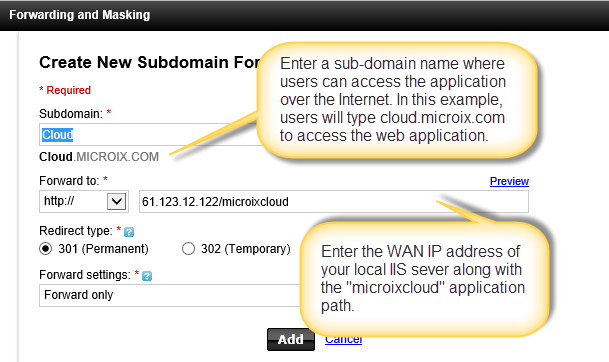
Step 3. Verify the WAN IP address you entered with your domain hosting provider (step 2) matches your static IP address which should have been assigned to you by your ISP provider. You may also view the static IP address within your router's web management software. If all setup are done correctly, you should be able to access your microix cloud application from outside your local network.
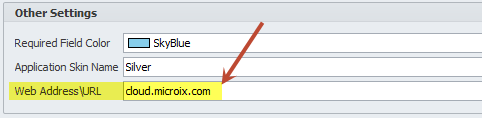
Step 4. Finally, enter your newly created sub domain information by navigating to maintenance>Global Options>App Options.
Note: Do not use above domain name, WANP IP, Local IP address and web address while configuring Microix Cloud on your server. This is just an example to explain how the domain needs to be configured. You will need to contact your IT guy to get all the above information.
Step 1. Change/modify your internal firewall (router) inbound services to allow HTTP request to your local IIS server (internal IP address of IIS Server).
Step 2. Connect to your domain hosting provider and use their administration panel (if one exist or call them) to create a sub-domain entry for your existing domain name.
Step 3. Verify the WAN IP address you entered with your domain hosting provider (step 2) matches your static IP address which should have been assigned to you by your ISP provider. You may also view the static IP address within your router's web management software. If all setup are done correctly, you should be able to access your microix cloud application from outside your local network.
Step 4. Finally, enter your newly created sub domain information by navigating to maintenance>Global Options>App Options.
Note: Do not use above domain name, WANP IP, Local IP address and web address while configuring Microix Cloud on your server. This is just an example to explain how the domain needs to be configured. You will need to contact your IT guy to get all the above information.
image001.png
image002.png
DataImage84.png
DataImage86.png