How to use the barcode scanner to complete a physical count
How to use the barcode scanner to complete an inventory count sheet
Before you begin, make sure you have associated barcodes with the items to be counted. You will utilize the Microix Barcode software and your barcode scanning hardware to complete the task. After you are finished with your count, you can refer to article 10845 for information on Importing the sheet to Microix.
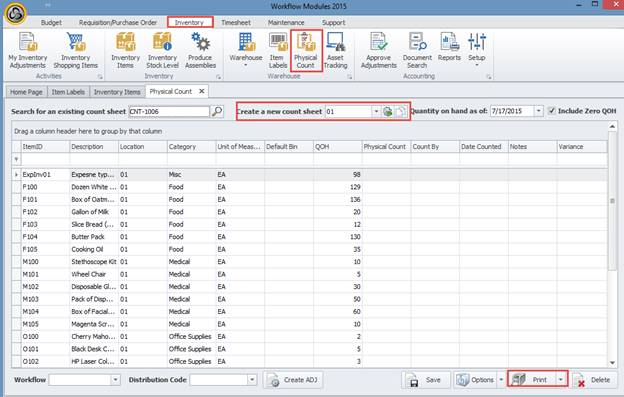
1. You will start a physical count sheet. Navigate to Inventory > Physical Count.
2. Next, Select an existing count sheet or select a location from the drop down to create a new one.
3. Finally, print the physical count worksheet with the print button located in the bottom right corner.
4. Now, with the printed document and barcode scanner in hand, head to the physical count location.
5. Power on the device and launch Microix Barcode 2.1
6. Select Physical Count inside the barcode scanning software.
7. For Sheet No, scan the Physical Count barcode in the top right corner of the printed document.

8. For barcode, scan the barcode affixed to the item that we verified existed in step 2. Enter the quantity that you are physically counting. Press “ENT” on the device to save the line and start a new item.
9. Click Save to save this physical count sheet to the device’s my documents folder where it will stand ready for import. Alternatively, if you are using WCF services, you may click Send to upload to Microix. For more information regarding ‘Send’ function, see article cited in step 10.
10. Review article 10845 for information on how to import the device's data into Microix.
Before you begin, make sure you have associated barcodes with the items to be counted. You will utilize the Microix Barcode software and your barcode scanning hardware to complete the task. After you are finished with your count, you can refer to article 10845 for information on Importing the sheet to Microix.
1. You will start a physical count sheet. Navigate to Inventory > Physical Count.
2. Next, Select an existing count sheet or select a location from the drop down to create a new one.
3. Finally, print the physical count worksheet with the print button located in the bottom right corner.
4. Now, with the printed document and barcode scanner in hand, head to the physical count location.
5. Power on the device and launch Microix Barcode 2.1
6. Select Physical Count inside the barcode scanning software.
7. For Sheet No, scan the Physical Count barcode in the top right corner of the printed document.
8. For barcode, scan the barcode affixed to the item that we verified existed in step 2. Enter the quantity that you are physically counting. Press “ENT” on the device to save the line and start a new item.
9. Click Save to save this physical count sheet to the device’s my documents folder where it will stand ready for import. Alternatively, if you are using WCF services, you may click Send to upload to Microix. For more information regarding ‘Send’ function, see article cited in step 10.
10. Review article 10845 for information on how to import the device's data into Microix.
image002.jpg
2015-07-10_16-42-47.png